WHEN DO YOU CUT BACK A LEYLANDII HEDGE?

When do you cut back a Leylandii hedge


There has been a lot of controversy regarding planting Leylandii hedges, almost always due to the 'antisocial' height and size they achieve. They block out the sun, casting large areas of shade on neighbouring properties. Furthermore, older specimens can take up a huge amount of space in the garden as well as render the soil beneath dry, and unable to support other plants.

Overgrown leylandii
The current legislation regarding overgrown Leylandii hedges in the United Kingdom comes under Section 8 of the Anti-Social Behaviour Act (2003). This allows local councils to take action when the hedge has grown to a height where...

“...the hedge is adversely affecting the complainant’s reasonable enjoyment of their property...”

When properly cut back and maintained, leylandii hedging can produce an absolutely stunning, compact hedge. However unlike most other hedges which will only need cutting once a year, leylandii hedging will need two and even three cuts a year to keep it in check. Forget to cut it back one year and it may already be too late to get it under control!

Leylandii hedge
For a newly planted hedge, trim back the overlong side-hoots at the beginning of the growing season. In northern Europe this will be around April. Come July make a second cut to lightly trim the sides. Then in July tie in the leader branch to a supporting cane.

In its second year trim the side-shoots again. This will encourage the formation of dense growth and leave a neat appearance over winter. Leylandii hedges can grow up to 1 metre a year and can quickly reach your desired height. Once the required height is reached, shorten the leading shoots to 15 cm  below the required height. The subsequent lower new growth will soon make up the height difference and form a thick top

For all other existing hedges, prune 2-3 times a year between April and the end of August.

For related articles click onto the following links:
HOW TO GROW A LEYLANDII HEDGE
WHEN AND HOW DO YOU PRUNE BACK WEIGELA
WHEN DO YOU CUT BACK A LEYLANDII HEDGE?

HOW TO GROW TOMATOES IN POTS

How to grow tomatoes in pots


I have a passion for freshly picked tomatoes from the vine. The flesh is considerably more succulent, and far more flavoursome. More importantly, the experience of eating homegrown produce is so much more satisfying than eating a shop-bought tomato straight from the fridge.

Luckily, tomato plants are very easy to grow from seed, and even if you are limited on garden space you can still bring a tomato plant to fruition in a pot or container. Just make sure that the container is of a decent size, that you can place your tomato plant in full sun, and that it is regularly watered and fertilized when necessary.

When growing tomatoes in pots, the chances are that you will only be growing a few plants in which case you would probably be better off purchasing pot-grown tomato seedlings from your local plant retailer. Equally so if you intend to grow a number of different cultivars. If more plants are required then consider growing your own tomato plants from seed.

How to grow tomatoes from seed

How to grow tomatoes in pots
Tomatoes originated from the South American Andes and as such are not hardy in northern European climates. As such they tomato seeds will need to be sown under protection from March to April so that they are ready to grow outside as soon as the threat of late frosts have passed.

Using 9 cm pots containing a good quality seed compost, sow tomato seeds onto the surface at a rate of three seeds per pot. Press the seeds firmly into the compost but do not bury them as they require the presence of light to help initiate germination.

Water from the base to prevent the seeds from being disturbed and place in a heated propagator with an approximate temperature of between 15-20C. If you do not have a propagator then seal the pots inside a clear polythene bag and place on a warm bright windowsill - but one which does not receive direct sunlight. You can expect germination to occur between 7-14 days, at which point the pots can be removed from the propagator or bag. Maintain bright, frost-free conditions, and once the seedlings are large enough to handle remove the two weakest seedlings.

Growing tomatoes in pots

How to grow tomatoes in pots
You will need pots or containers of at least 25 cm diameter, filled with a good quality soil-based compost such as John Innes 'No 3'. Keep the compost moist but not waterlogged and once the first flower trusses begin to show they can be hardened off over a week or so before placing outside in their final position. For northern Europe this will be around the end of May, but check the weather forecasts beforehand to make sure that there is no longer any threat from late frosts. Where possible, place in a sunny, sheltered position.

Tie the main stem of the plant to a vertical bamboo cane for support or wind it round a tall section of stiff, plastic netting. Water regularly to keep the compost evenly moist, and feed with a specific high potash tomato fertiliser every 10-14 days one once the first fruits start to set.

Remove the side-shoots regularly when they reach about 2.5cm long, and remove any yellowing leaves which occur below developing fruit trusses.

Main image credit - Mason Masteka https://creativecommons.org/licenses/by-sa/2.0/deed.en
In text image - Dennis Brown https://creativecommons.org/licenses/by-sa/3.0/deed.en
In text image - Tigris Lagoona https://creativecommons.org/licenses/by-sa/3.0/deed.en

For related articles click onto the following links:
BLIGHT RESISTANT TOMATO SEEDS - Tomato 'Ferline'
HOW TO GROW TOMATOES IN POTS

HOW TO GROW A CHRISTMAS TREE

How to grow a Christmas tree
If you have bought yourself a rooted or pot grown Christmas tree and would like to grow it on in the garden for subsequent years, well the chances are you can. Unless it has overheated, been over-watered, under-watered or plain old 'dried out' over the festive season, in which case it probably won't.
Christmas trees - https://www.sapcotegc.co.uk/
The most popular Christmas tree species in the United Kingdom is the Norway spruce, closely followed by the Nordmann fir, but the growing requirements for most Christmas tree species are largely similar. Just be aware that mature Christmas trees can easily reach a height of 50 ft or more once mature and so may not be suitable for suburban gardens.

Christmas trees will do best in deep, moist soils with a moderate or high acidic content. Plant outside as soon as you can, however any Christmas trees keep in warm conditions may need to hardened off first for a week or two before planting outside. If the weather is relatively mild and no immediate threat of frosts then hardening off may be unnecessary. If in doubt, provide frost protection such as horticultural fleece. If only heavy soils are available then delay planting until the spring.

Christmas tree cones - http://forums.gardenweb.com/
Christmas trees will prefer to be planted in full sun, but a partially shaded position will do. Avoid exposed conditions as the new growth on young plants can be susceptible to damage from late spring frosts.

Apply a phosphate rich fertilizer such as 'Fish, Blood and Bone' when planting, and a nitrogen rich fertiliser each May and again in June when growing on sandy soils. Maintain a weed-free root-run about a metre across for the first few years.

During it first year you may to to water during extended periods of low rainfall.

For related articles click onto the following links:
CAN I GROW A CHRISTMAS TREE FROM SEED?

HOW TO GROW DELOSPERMA COOPERI

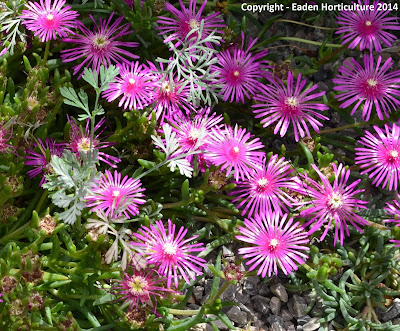
Delosperma cooperi flowering in a pot
How to grow Delosperma cooperi


African succulent plants always bring a touch of the exotic to northern European gardens. Unfortunately they are often frost-tender and as such their time in the garden is usually short lived. There is one species however that has not only proven itself to be frost hardy, but also has an outstanding floral display. Commonly known as 'Cooper’s Ice Plant', this particular garden gem is Delosperma cooperi.

Delosperma cooperi blooms
Native to the Free State province of South Africa, Delosperma cooperi is a mat-forming, dwarf, perennial plant notable for thriving in dry, hot environments. Once established you can expect it to grow to a height of between 3-6 inches and a spread of approximately 1-3 ft in diameter depending on growing conditions,

The succulent, fleshy leaves are cylindrical in shape and mid-green in colour. Under cold conditions the leaves can turn to hues of red. They are also covered with light-refracting, bladder-like hairs that look similar to tiny ice crystals, which explains its common name.

The neon-pink, daisy-like blooms are up to 2 inches wide and appear from June to September. However it will need to be in a position of full sun to achieve the exceptional display associated with this species. There is a certain amount of colour variation which can result in plants displaying vermillion or magenta blooms.

Delosperma cooperi will do particularly well in a Mediterranean environment, but as it reputedly capable of surviving temperatures as low as -29 °Celsius it should therefore do well in cooler northern European climates. Well yes and no. while Delosperma cooperi is more than happy coping with the cold, what it particularly dislikes is the wet.

With this in mind, plant Delosperma cooperi in dry, sharply-drained soils. Avoid clay soils or any other ground that prone to waterlogging, otherwise it will grow poorly or even fail.

For related articles click onto the following links:
HOW TO GROW DELOSPERMA COOPERI
HOW TO GROW ERIGERON KARVINSKIANUS
HOW TO GROW LITHOPS INDOORS
HOW TO GROW PORTULACA FROM SEED
HOW TO GROW PORTULACA GRANDIFLORA - THE SUN PLANT
WHICH PLANT IS 'LONDON PRIDE'?

HOW TO GROW MESEMBRYANTHEMUM FROM SEED

How to grow mesembryanthemum from seed


Commonly known as the 'Livingstone Daisy', Mesembryanthemum criniflorum is a popular half-hardy annual noted for its brightly coloured blooms and glistening succulent leaves. While the botanical name Mesembryanthemum criniflorum is the most widely used within the gardening industry, it is currently classified as Dorotheanthus bellidiformis.

Mesembryanthemum seedlings
Despite its exotic looks it is surprisingly easy to grow from seed. However to make the most of the shorter northern European growing seasons, sow mesembryanthemum seed under protection from late winter to spring.

Using modular trays filled with a good quality, well-drained compost such as John Innes 'Seeds and Cutting', sow the seeds on the surface at an approximate rate of 10 seeds per module. Do not cover the seeds as they require the presence of light to help initiate germination. Instead gently firm down the compost without sinking the seeds into the compost.

If you are watering from the surface you may wish to add a thin layer of vermiculite to prevent the seeds from being washed around the seed tray. Alternatively water from the base so that water naturally rises through the compost. Once the surface of the compost darken remove water from the base of the seed tray.

Mesembryanthemum flowers
Place the seed tray inside a heated propagator at approximately 15-20 degrees Celsius. Alternatively seal the tray inside a clear, polythene bag. Keep the compost damp but avoid direct sunlight. You can expect germination to occur between 15-21 days.

Once the seedlings emerge, remove them from the propagator or polythene bag but they will still need to be kept in a warm, bright, frost-free position.

When the roots have become established in the modules they can be popped out and potted on into 9 cm pots and grown on in cooler conditions for a further 10-15 days to harden off. They can be planted outside into their final position once all risk of frost has passed. Plant Mesembryanthemum criniflorum plants 30 cm apart. To flower they will require as much of the available sunlight as possible. They will perform best planted in a light well-drained soil.

For related articles click onto the following links:
HOW TO GROW DELOSPERMA COOPERI
HOW TO GROW ERIGERON KARVINSKIANUS
HOW TO GROW LITHOPS INDOORS
HOW TO GROW MESEMBRYANTHEMUM FROM SEED
HOW TO GROW PORTULACA FROM SEED
HOW TO GROW PORTULACA GRANDIFLORA - THE SUN PLANT

HOW TO PRUNE FUCHSIAS

How to prune Fuchsias


While fuchsias are mostly native to the tropical or subtropical native regions of South America, there are a significant number of cultivars that are hardy enough to survive the freezing winters of northern European climates. While some cultivars such as the popular Fuchsia 'Tom Thumb' will only reach approximately 50 cm tall when mature, most shrubby forms (when left to their own devices) will reach up to 4 metres.

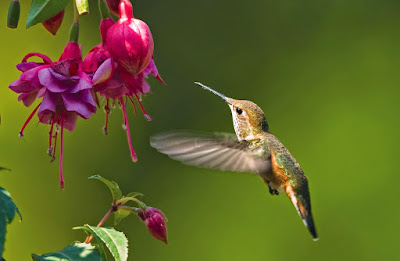
Fuchsia blooms and hummingbird
Fuchsia blooms
Although it may seem a little drastic, cut hardy fuchsia species and hybrids down to ground level in November, or (if you miss this key period) in March to April. Alternatively, cut back the stems to a permanent low framework.

In colder, more northerly climates consider apply a dry mulch to help prevent the soil from freezing. The root systems of healthy fuschia are surprisingly robust and even reasonable fragments of mature roots can produce new shoots under favourable conditions.

Of course, in milder mediterranean climates hardy fuchsias can be left as they are. But should you wish to prune to reshape your plant or remove any dead or diseased branches this can be done in April or May.

For related articles click onto the following links:
ARE FUCHSIA BERRIES EDIBLE?
FUCHSIA THALIA
HOW TO GROW FUCHSIA 'AUTUMNALE'
HOW TO GROW FUCHSIA 'GENII'
HOW TO GROW FUCHSIA MAGELLANICA 'Riccartonii'
HOW TO GROW FUCHSIA 'TOM WEST'
HOW TO PRUNE FUCHSIAS
WHEN TO PRUNE WISTERIA?

HOW TO GROW PORTULACA FROM SEED

How to grow Portulaca from seed


Native to the tropical and warm temperate regions of the world, Portulaca is a genus of succulent, evergreen, annual and perennial plants. In countries which experience freezing conditions over the winter period, all portulaca species will need to be treated as annuals. So when propagating plants for garden use they will all need to be sown under protection in the early spring.

Portulaca seedlings
Sow portulaca seeds under protection (as in a heated greenhouse or warm, bright room) from February to March. Using modular seed trays filled with a good quality compost such as John Innes 'Seed and Cutting', sow approximately ten seeds per module. Do not cover the seed with compost as portulaca seeds require the presence of light to help initiate germination, instead place on the surface and gently firm down. If you wish, you can apply a thin layer of vermiculite to the surface, Gently water the compost by allowing it to rise up from the base of the seed tray. This can be achieved by partially sinking the tray into a suitably sized bowl of water. Place the tray inside a heated propagator at a temperature between of 18-21 degrees Celsius. Alternatively seal the seed tray inside a clear polythene bag and leave in a warm bright position, but one which does not receive direct sunlight. You can expect germination to occur within 7- 14 days. Do not exclude light, as this helps germination. Keep the compost moist but do not allow the roots to become waterlogged.

How to grow Portulaca from seed
Once the roots have established in their modules and are large enough to handle, they can be popped out of their modules and potted on into 3 inch pots at a rate of one module per pot. Try to disturb the root ball as little as possible, the roots do not need to be teased apart prior to planting.

The newly potted portulaca can be grown on in cooler conditions such as an unheated greenhouse or cold frame but only once the threat of late frosts have passed - usually by the end of May. After 10-15 days they can be planted outside into their final position.

If you do not have the facilities to grow seedlings under protection then direct sow the seeds from the middle of May onwards.

For related articles click onto the following links:
HOW TO GROW DELOSPERMA COOPERI
HOW TO GROW LITHOPS INDOORS
HOW TO GROW MESEMBRYANTHEMUM FROM SEED
HOW TO GROW PORTULACA FROM SEED
HOW TO GROW PORTULACA GRANDIFLORA - THE SUN PLANT

HOW TO GROW PORTULACA GRANDIFLORA - THE SUN PLANT


Portulaca grandiflora is a half-hardy annual suitable for growing in borders and rock gardens. Native to Argentina, southern Brazil, and Uruguay, it is a succulent plant with semi-prostrate red stems. It is a small, but fast-growing plant growing to 30 cm tall under favourable conditions however this is usually around 15 cm under garden conditions.

Pot grown portulacas in bloom
The narrow, fleshy leaves are cylindrical in cross-section and bright green in colour. Each leaf can be up to 2.5 cm long, and arranged alternately or in small clusters.

The saucer-shaped blooms are approximately 2.5-3 cm across with a central boss of bright yellow stamens. The blooms can emerge in a variety of colours, most notably red, purple, yellow and white. Numerous cultivars have been developed producing forms with additional petals, double flowers and increased variation in flower colour.

Plant portulacas outside in May, and only then once the threat of late frosts have passed. They will perform best in any well-drained garden soil, thriving under hot, dry conditions in full sun. Consider adding a general purpose, high nitrogen fertilizer when first planting, with a second addition of high Phosphorous fertilizer just before the plants come into flower.

When planting in groups, spaced at a distance of 30 cm apart, and deadhead spent flowers to promote more blooms.  Portulaca will only require watering when the plants show signs of wilting.

For related articles click onto the following links:
GASTERIA maculata
HOW TO GROW DELOSPERMA COOPERI
HOW TO GROW MESEMBRYANTHEMUM FROM SEED
HOW TO GROW PORTULACA FROM SEED
HOW TO GROW PORTULACA GRANDIFLORA - THE SUN PLANT

HOW TO GROW IVY FROM CUTTINGS

Canary Island Ivy leaves
How to grow Ivy from cuttings

Ivy is a genus of 15 species (although some in the scientific community argue that there are in fact only 12) of hardy, evergreen, climbing or ground-creeping woody plants. They are a wide ranging family native throughout Europe, Macaronesia, northwestern Africa and across central-southern Asia and as far as Japan and Taiwan.

Image credit - http://themountaineer.villagesoup.com/
Luckily all ivy species and cultivated varieties propagate readily from cuttings, and usually with little provocation. The best time of year is during July and August. Using a sharp, sterilized blade, take 3-5 inch cuttings from the tips of vigorous running shoots. Make each cut directly above a leaf, and the lower cut below a leaf node. Remove the the lower two thirds leaves. Large leaf cultivars may require the remaining leaves to be cut in half to help reduce transpiration while the new roots are waiting to form. That way the risk of the cuttings drying out before they are able to root is reduced. If non-climbing, bushy growth is required then take cuttings only from adult stage growth.

Using a good quality compost such as John Innes 'Seed and Cutting'. or make own using an equal part by volume mix of moss peat and horticultural grade sand, fill to within 1/2 inch from the top your required number of 3 inch diameter pots. Place 1 cutting per pot and and gently water in. There is absolutely no need to use rooting hormone powder when propagating ivy from fresh cuttings.

Move the pots to an outside cold frame or unheated greenhouse. Once the roots have established in the pots they will be ready for planting into their final position.

Alternatively, take 6 inch cuttings from ripe shoots in October or November, removing the soft tips. The are then inserted into a prepared nursery bed of sandy soil in a sheltered position outside.

For related articles click onto the following links:

HOW TO PRUNE IVY

Image of High Castle in Malbork - https://upload.wikimedia.org/  

The majority of ivy - Hedera, species and cultivars are vigorous, large growing evergreen climbing plants and so when ivy is planted alongside garden walls or trellis it can easily become overgrown. Once it has become unwieldy or has covered the space required, begin cutting it back close to its support during February or March each year. Cut stems back to leave at least 18 inches on each healthy vine.

Image credit - http://www.public.asu.edu/~camartin/
Ivy can be pruned again over the summer to remove excessively long runners or any other unwanted growth.

When grown against houses, garages or other substantial garden building, prevent the top growth from venturing into the gutters or onto the roof. If left unchecked, gutters can be blocked and even pulled away from the wall while roof tiles can be lifted allowing rain to enter the roof space.

Even in situations where unlimited growth is not considered a problem, you should periodically prune out sections that become too matted and heavy as the plant may break away from its support.

Tired, old specimens can be rejuvenated by removing the older vines. New growth can be stimulated by pruning the tips back to about 1/2 inch above a leaf or bud.

For related articles click onto the following links: