WHEN AND HOW TO PRUNE BACK BUDDLEIA

When and how to prune back Buddleia


Understandably, many gardeners will see Buddleia species and cultivars as little more than weeds. However despite their apparent ubiquity, their flowers are a valuable a nectar source for many species of butterfly (hence the common name of butterfly bush), and twenty species and cultivars have been awarded the prestigious Award of Garden Merit from the Royal Horticultural Society.

When and how to prune back Buddleia
Buddleia are most notable for their blooms, so to get the most out of your buddleia you need to prune them appropriately and at the right time of year.

Surprisingly, for the majority of species no regular pruning is required. That being said, Buddleia davidii species and cultivars (with an unchecked height and spread of over 3 metres) can be kept to a manageable size by pruning in March. Cut all of the previous years growth back to within 5-10 cm of the old wood. This will cause the plant to produce strong, erect stems and large flower clusters.

When and how to prune back Buddleia
Species such as Buddleia globosa and B. colvilei flower on the previous year’s growth, should be lightly pruned after flowering by removing the faded clusters with approximately 5 cm of stem. Buddleia alternifolia can be kept neat and bushy by removing two-thirds of all stems after flowering.

After pruning always mulch the base of your Buddleia with well-rotted farm manure or garden compost. To help the following season's blooms you can also provide a high potash, slow or controlled release fertiliser.

For related articles click onto the following links:
HOW TO GROW BUDDLEIA DAVIDII
WHEN AND HOW TO PRUNE BACK CHOISYA TERNATA
WHEN AND HOW TO PRUNE BACK BUDDLEIA
WHEN AND HOW TO PRUNE HEBES


HOW TO PROPAGATE CLEMATIS BY LAYERING

How to propagate clematis by layering

The large-flowered clematis hybrids are among the most impressive of all ornamental climbers. However as they are all selected hybrids they will not grow true from seed and so they will all need to be propagated vegetatively.

How to propagate clematis by layering
While growing clematis from cuttings is the accepted method of propagation, it isn't straightforward as you will require a fungicidal drench, basal heat and hormone rooting powders.

While growing clematis from cuttings is a much quicker and allows for a larger number of plants to be produced, propagating clematis by layering is so much easier. The best time to propagate clematis this way is early spring using the serpentine (otherwise known as the compound) layering technique.

To begin with, choose a vigorous stem that has plenty of new growth and is long enough that it can be laid on the ground.

Rather than bury, and secure the stem directly into the ground (which you can do if you improve the soil with a humus rich compost), fill several 9 cm terracotta pots with a good quality soil-based compost such as John Innes 'Seed and Cutting', leaving a couple of centimetres gap at the top to aid watering. Bury the pots within each of the base of the stem, approximately 5 cm apart.

How to propagate clematis by layering
Being aware of where the stem will comfortably lie over the pots, cut short, narrow and shallow slices that will expose the cambium layer without cutting through it. Make as many cuts as you have pots, leaving a gap of approximately 20 cm between cuts.

As you would with regular clematis cuttings, dip each cut section into rooting hormone powder. Trying not to wipe the powder off, gently bury the cut stem sections 5 cm deep into separate pots. The vine should loop in and out of the pots.

Secure each cut section into its pot using a suitable peg or stone then gently water in. Continue to water regularly over the summer but avoid waterlogging. Water the pots well and keep them moist throughout the summer.

Roots should form over the coming months, and come the spring you can sever the stems between these new plants and from the mother plant.

Pot on into 1 litre pots. and once established they can be planted out into their final position.

For related articles click onto the following links:
CLEMATIS 'NELLY MOSER'

HOW TO GROW VITIS VINIFERA 'PURPUREA'

How to grow Vitis vinifera ‘Purpurea’


When it come to choosing climbing plants for the garden, beside the blooms and leaf shapes, there is little choice in foliage colour. However disipe Henry Ford's (misquoted) slogan of '... any customer can have a climbing plant of any color that they want so long as it is green...', Vitis vinifera ‘Purpurea’ is a glorious exception.

Vitis vinifera ‘Purpurea’ fruits
Commonly known as the Purple-leaved grape vine, Teinturier grape or Claret grape, Vitis vinifera ‘Purpurea’ is a vigorous, deciduous, large tendril-climber with deeply-lobed leaves. Given favourable conditions it can reach a height of approximately 4-8 metres with a spread of 1.5-2.5 metres. However when grown along a standard height fence (1.8 metres), you can easily expect a run of 6-8 metres.

While Vitis vinifera ‘Purpurea’ will produce both flowers and small, deep purple grapes, it is the gorgeous purple summer foliage which is its notable feature. They emerge a claret-red in the spring, and these gorgeous pigments will deepen almost to black by late summer, turning crimson-tinted into the autumn. It is particularly effective when grown as a backdrop to silver or grey foliage plants. This is used to great effect when training Vitis vinifera ‘Purpurea’ into Pyrus salicifolia 'Pendula' - the ornamental, weeping, silver-leaved pear.

How to grow Vitis vinifera ‘Purpurea’
Vitis vinifera ‘Purpurea’ will perform best in a deeply cultivated, moist loamy soil. Lime will need to be added if the soil is on the acidic side. Luckily, almost any position and aspect will be suitable, just provide a structure for support. Tie the branches into a well-spaced framework, the plant will then support itself as the growing season progresses. It its first year water during extended period of drought.

Vitis vinifera ‘Purpurea’ received the Award of Merit (AM) from the Royal Horticultural Society in 1958, and the Award of Garden Merit (AGM) in 1984.

For related articles click onto the following links:
CLIMBING PLANTS FOR AUTUMN COLOUR
CLIMBING PLANTS FOR FOLIAGE COLOUR EFFECT
HOW TO GROW VITIS VINIFERA 'PURPUREA'

HOW TO GROW COTINUS COGGYGRIA 'ROYAL PURPLE' BY LAYERING

How to grow Cotinus coggygria 'Royal Purple' by layering


Cotinus coggygria 'Royal Purple' is arguably one of the best purple-leaved architectural garden plants. There are two acceptable ways for propagating Cotinus coggygria 'Royal Purple'. The first, and most commonly applied, technique is cuttings. The second is from layering which while being much slower it is in fact a far more viable method of propagation.

How to grow Cotinus coggygria 'Royal Purple' by layering
Propagating Cotinus coggygria 'Royal Purple' by layering is the simplest method and is best undertaken in September. First prepare the soil below where you are going to root the cutting by mixing in a good quality compost. Heavy, poor draining soils can be improved with horticultural grade coarse sand. Take a long shoot from the base of the plant and bend it at the point where you which to encourage root growth. The rest of the stem up to the apical tip will need to be supported in an upright position using a sturdy cane. Wound the stem at the bend by removing a small sliver of bark. You can apply rooting hormone powder to the wound but this is not really necessary.

Bury the stem a couple of inches deep then secure in place using a metal pin, brick or a suitably sized stone.

You will be able to sever the stem from the parent plant in approximately 12-18 months.

For related articles click onto the following links:
COTINUS COGGYGRIA 'ROYAL PURPLE'
HOW TO GROW COTINUS COGGYGRIA 'ROYAL PURPLE' BY LAYERING
HOW TO PROPAGATE CHOISYA TERNATA 'SUNDANCE' FROM CUTTINGS
HOW TO PROPAGATE ROSES BY LAYERING
HOW TO PROPAGATE SHRUBS BY LAYERING
WHEN AND HOW TO PRUNE COTINUS COGGYGRIA 'VELVET CLOAK'

HOW TO PROPAGATE SHRUBS BY LAYERING

How to propagate shrubs by layering - http://www.rodalesorganiclife.com/


Layering is a method of propagation by which a stem or a shoot of a plant is induced to produce roots while still being attached to the parent plant. Some trees and shrubs, and in particular pendulous species will layer themselves naturally when their stems touch the ground. Examples of this are often exhibited by Forsythia suspensa and Salix x chrysocoma.

How to propagate shrubs by layering
The majority of woody plants may be layered, and this method will often prove successful when propagation from cuttings fails. Even some herbaceous plants will respond to layering, notably carnations.

Surprisingly, shrub stems can be layered at any time of year, but September to November will provide the best results. Prior to layering, dig the surrounding soil to break up any compressed ground. Enrich poor, thin soils with fine-graded moss peat, and lighten heavy soils with horticultural grade coarse sand.

The chosen shoots should be healthy, vigorous and between 1-2 years old. Bend the shoot down to soil level with the growing tip held upwards at a right angle to the soil and supported in place by a sturdy cane. This will encourage apical dominance with will allow the new plant to form the characteristic shape of the parent plant. Inset the bent section of the stem into the soil and secure in place with a 'U'-shaped section of strong wire or stones. Cover the bent section with soil and firm in place.

How to propagate shrubs by layering
Rooting can be encouraged by wounding the bent section of the stem, either by removing a small sliver or circlet of bark, or by making a shallow, oblique cut into the stem so that a small tongue opens then the shoot is bent. Depending on the species a small application of rooting hormone powder to the wound may be necessary to encourage root initiation.

Be aware that this method of propagation is comparatively slow compared to cuttings, but it should be possible to sever the connection to the parent plant after 1-3 years when the plants are dormant. The rooted cutting is now ready to be lifted and planted into its final position.

Transplanting can made easier by layering the stems into pots or boxes buried into the soil, but care must be taken to make sure that the stems do not dry out during prolonged period of hot, dry weather.

For related articles click onto the following links:
HOW TO GROW COTINUS COGGYGRIA 'ROYAL PURPLE' BY LAYERING
HOW TO PROPAGATE ROSES BY LAYERING
HOW TO PROPAGATE SHRUBS BY LAYERING

HOW TO TAKE CUTTINGS FROM TRACHELOSPERMUM JASMINOIDES

How to take cuttings from Trachelospermum jasminoides


Commonly known as the 'Star Jasmine', Trachelospermum jasminoides is a popular, evergreen, ornamental climbing plants, noted for its profusion of highly scented, star-shaped blooms.

Native to eastern and southeastern Asia, it has proven itself to be surprisingly hardy, and so long as it is positioned in full sun, and in a well-drained soil, it can be grown outside in the warmer regions of northern Europe without the need for winter protection.

Successful propagation of Trachelospermum jasminoides is best achieved by taking semi-hardwood cuttings in summer. Water the parent plant the day before the cuttings are required to ensure that the subsequent plant material is suitably turgid. To reduce the risk of the cutting material of drying out before they have been struck, take your cuttings in the early morning, preferably on a cloudy day.

Trachelospermum jasminoides cutting - https://i.ytimg.com/
Using a sharp, sterilized blade, cut a 30cm length of vigorous vine from a healthy star jasmine plant. Make the cut just below a node, which is the small swelling where a leaf or bud emerges. Without breaking the vine section, place inside a cool, damp bag or box and keep out of direct sunlight.

Using 9 cm pots containing a well-drained, low-nutrient compost such as John Innes 'Seed and Cutting', prepare a single, deep hole in the middle using a dibber. Cut the vine section into 10 cm cuttings, again making your cut just below a node, taking care to identify the direction of growth so that you do not end up striking your cuttings upside down. Remove the leaves form the lower half of the cutting and dip the base in a rooting hormone powder. Being careful not to wipe the powder off, insert the cutting into the pre-drilled hole. Gently pack the compost around the cutting for support and gently water in.

Place the pots inside a heated propagator at a temperature of approximately 18-22 degrees Celsius. Alternatively, place the pots inside a sealed, clear, polythene bag in a warm, bright position, but one which does not receive direct sunlight as this can dry out the compost and overheat the cutting causing it to also dry out. Keep the compost moist. but not waterlogged. You can expect rooting to take place in approximately 4 weeks.

Once rooting has occurred, remove the cuttings from the propagator or polythene bag, and continue to grow on until the roots have established in the pot. At this point the cuttings can be potted on into 1 litre pots and hardened off outside in a bright, sheltered position, but again out of direct sunlight.

Your young Trachelospermum jasminoides plants will be ready for planting out into their final position come the following spring once all risk of late frosts have passed.

For related articles click onto the following links:
CLIMBING PLANTS FOR AUTUMN COLOUR
CLIMBING PLANTS FOR FOLIAGE COLOUR EFFECT
HOW TO GROW WINTER JASMINE
HOW TO PROPAGATE CHOISYA TERNATA 'SUNDANCE' FROM CUTTINGS
HOW TO TAKE CUTTINGS FROM TRACHELOSPERMUM JASMINOIDES
JASMINUM BEESIANUM
JASMINUM NUDIFLORUM - The winter jasmine

HOW TO GROW SAGE FROM SEED

How to grow sage from seed


Otherwise commonly known as English Sage, culinary sage - salvia officinalis, is a perennial, evergreen subshrub native to the Mediterranean region. It has a savory, slightly peppery flavour, and is known in Britain as one of the essential herbs, along with parsley, rosemary and thyme.

Sage seeds
Sage is best propagated from seed from March to May. Use pots or medium sized modular seed trays containing a good quality compost such as John Innes 'Seed and cutting'. Gently water the compost in using a fine rose and sow the seeds a rate of one seed per module or 5 seeds equally spaced in a 9 cm pot.

Press, not bury, the seeds onto the surface of the compost and then cover with a thin layer of horticultural grit or vermiculite, or a sprinkling of finely sieved compost.

Place the pots or tray inside a propagator at approximately 15-20 degrees Celsius. Alternatively seal inside a clear polythene bag and place in a warm, bright position, but one which does not receive direct sunlight as this can cause the compost to dry out and excessive temperatures. You can expect the seedlings to begin emerging from approximately 21 days onwards. At this point remove the pots or tray from the propagator or bag.

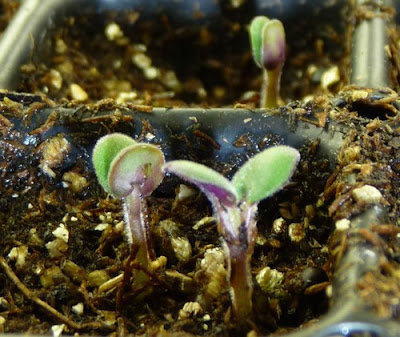
Sage seedlings
When the seedlings are large enough to handle, they can be transplanted into 7.5cm pots containing John Innes No.1 or 2 and grow on in cooler conditions.

Once the risk of frost has passed, the sage seedlings can be hardened off to outdoor conditions over 7 - 10 days before planting outside into their final position.

Plant on any fertile, free draining, non acidic soil, preferably previously enriched with well-rotted farm manure or garden compost. Sage will require a position where it will receive full sun for as much of the day as possible.

Plant multiple sage plants at a distance of 40 cm apart

Once established sage has been proven to be relatively drought tolerant, although they will appreciate watering during spells of hot, dry weather.

Prune sage plants in late spring to encourage new shoots, this will also improve the flavour.

For related articles click onto the following links:
HERBS FOR ANXIETY RELIEF
HOW TO GROW LEMONGRASS
HOW TO GROW LEMONGRASS FROM SEED
HOW TO GROW MINT PLANTS
HOW TO GROW SAGE FROM SEED
HOW TO GROW THYME - Thymus vulgaris