HOW TO GROW MARIGOLDS FROM SEED

How to grow marigolds from seed - //www.peacegallerychallenge.org/


Marigolds flowers are like a little drops of sunshine, and so its no wonder they are such a perennially popular bedding plant. Native to North and South America the popular bedding marigolds, namely cultivars of African and French marigold, are both from the genus Tagetes which makes them a member of the sunflower family.

Marigold botanical illustration
The common name marigold is a corruption of Mary's Gold, Mary being the Virgin Mary, however this is name was more originally applied to the European native Calendula officinalis - the English Marigold.

However the confusion with the common names doesn't stop there. Unsurprisingly, African marigolds - Tagetes erecta are not from Africa and are actually from Mexico, and while French marigolds are varieties that were developed in France these hybrids and cultivars were developed from Tagetes patula, another native to the Americas.

Luckily, growing marigolds from seed couldn't be easier and you can even grow your own seed collected from last seasons plants. Sow marigolds any time from February until April, but this will need to be under protection as late frosts will easily destroy emerging seedlings.

First fill a modular seed tray using a good quality compost such as John Innes 'Seed and Cutting', then sow one seed on the surface of each module. Give them a thin covering of compost (approximately 1/8 inch deep) and then gently water in. There is no need to place the tray in a propagator as marigold seeds germinate quickly. Place the tray on a warm, bright windowsill but out of direct sunlight. If you are germinating in a greenhouse then they will need temperatures of between 21-24 degrees Celsius. You can expect the seedlings to emerge in 5-10 days.

Marigold seedlings - http://forksknivesandspades.blogspot.co.uk/
When the seedlings are large enough to handle, transplant each one into a 3 inch pot. They can then be grown on in a cooler, but frost free conditions. Once the threat of late frosts have passed they can be planted into their final position.

Marigolds will grow well in any well-cultivated soil and will even tolerate poor, rather dry soils. They prefer an open sunny site and while deadheading isn't essential it will help to improve growth and flower size.

Did you know?

Marigolds are used as a 'Flower of the Dead' in Mexico, and even though the it is used in a lot of floral bouquets and arrangements it actually represents grief, cruelty, and jealousy.

The flower petals are edible and can be used in lettuce salads and other foods to add colour and flavour.

For related articles click onto the following links:
HOW TO GROW ANTIRRHINUMS FROM SEED
HOW TO GROW BRACHYSCOME
How to Grow Marigolds from Seed

HOW TO GROW STRAWBERRIES IN POTS AND CONTAINERS

How to grow strawberries in pots or containers - http://www.gardenista.com/


You are never going to be able to compete with the sublime flavour of a traditional field grown strawberry if you intend to to grow your strawberry plants in a pot or container. However there is one clear advantage to pot grown strawberries that must be taken very seriously.

Ripening strawberries are a magnet to slugs and snails and if you don't have effective protection in place then prepare yourself for a crop riddled in slug-shaped holes.

How to grow strawberries in pots - http://www.hgtvgardens.com/
In fact the name 'strawberry' arose from the long-established production method designed to deter the damage from slugs and snails, the practice of growing strawberries on beds of straw.

The main benefit of pot grown fruit is that they can be moved away from areas of high risk and also take copper bands which will prevent slugs and snails from climbing the pot and reaching the fruit.

Luckily, strawberries are well-suited for growing in pots, containers and even hanging baskets making them an ideal crop for anyone with limited space.

Now this is the important part. Container grown strawberries will not have the flavour of field grown fruit as they do not have access to the full range of macro and micronutrients found in organic-rich soils. Strawberries need this full spectrum of nutrients in order to produce the the very best flavour. Be that as it may, pot grown strawberries will still taste better than than shop bought fruit and can be improved further with good production techniques.

How to grow strawberries in containers - http://mytinyplot.com/
A 12" container is suitable for three strawberry plants, any more and the competition for light, limited nutrients and water will ultimately reduce cropping.

Plant strawberries using a rich soil-based compost such as John Innes 'No.3'. Ensure the basket is not filled to the rim, as you will need an inch or so gap left watering, and do not plant the strawberries deeper than they were in their original pots.

Mixing in a controlled release fertilizer such as osmocote will provide sufficient macronutrients for the first few months. Once planted move to a sunny position, and then alternately feed on a weekly basis a high potash, liquid soluble fertilizer, and on the opposite week a liquid soluble seaweed-based fertiliser to help provide essential micronutrients.

Do not allow the compost to dry out and equally do not allow the compost to become water-logged for long periods of time.

How to grow strawberries - http://1.bp.blogspot.com/
Consider incorporating some water-retaining granules into the compost before planting as this will reduce the risk of drying out over the summer.

Check the compost daily in hot weather and water if the top half-inch of compost feels dry. Traditional hanging baskets will require more watering than porous terracotta pots, and in turn, porous pot will need more water than glazed.

Just before the fruits begin to ripen, you may need to cover your strawberries with some suitable netting otherwise you risk your precious crop from being eaten by ravenous birds.

As they strawberries grow they may produce ‘runners’ which are trailing stems with young strawberry plants along the length. These should be removed from early summer onwards  to help direct energy into flowering and fruiting.

For related articles click onto the following links:
HOW TO COLLECT AND PREPARE STRAWBERRY SEED FOR PROPAGATION
How to Grow an Apple Tree from Seed
HOW TO GROW ARBUTUS UNEDO
How to Grow Blackberries
How to grow a Cherry Tree from Seed
How to Grow a Pineapple from Seed
HOW TO GROW STRAWBERRIES
HOW TO GROW STRAWBERRIES FROM SEED
How to Grow Strawberries in Pots and Containers
HOW TO GROW THE STRAWBERRY TREE - Arbutus unedo
HOW TO GROW TAYBERRIES
HOW TO OVERWINTER STRAWBERRIES
HOW TO PROPAGATE STRAWBERRIES
How to take Cuttings from Strawberry Plants
Growing Garlic in Pots and Containers
STRAWBERRY PLANT PESTS AND DISEASES
What is a Pineberry

CAMELLIA 'ROYALTY'

Camellia 'Royalty'

While Camellia 'Royalty' looks every inch a japonica species, it it in fact a hybrid between Camellia japonica 'Clarise Carlton' and Camellia reticulata 'Cornelian'.

Developed in 1968, this evergreen shrub was selected for its compact, upright habit. Although its overall height is comparably lacking compared to most other camellia cultivars it will certainly mature to 4-6 feet tall making Camellia 'Royalty' a better choice for most people's gardens.

Camellia 'Royalty'
The dark-green leaves of Camellia 'Royalty' are both particularly dense and extremely lush making the perfect backdrop for its early blooms.

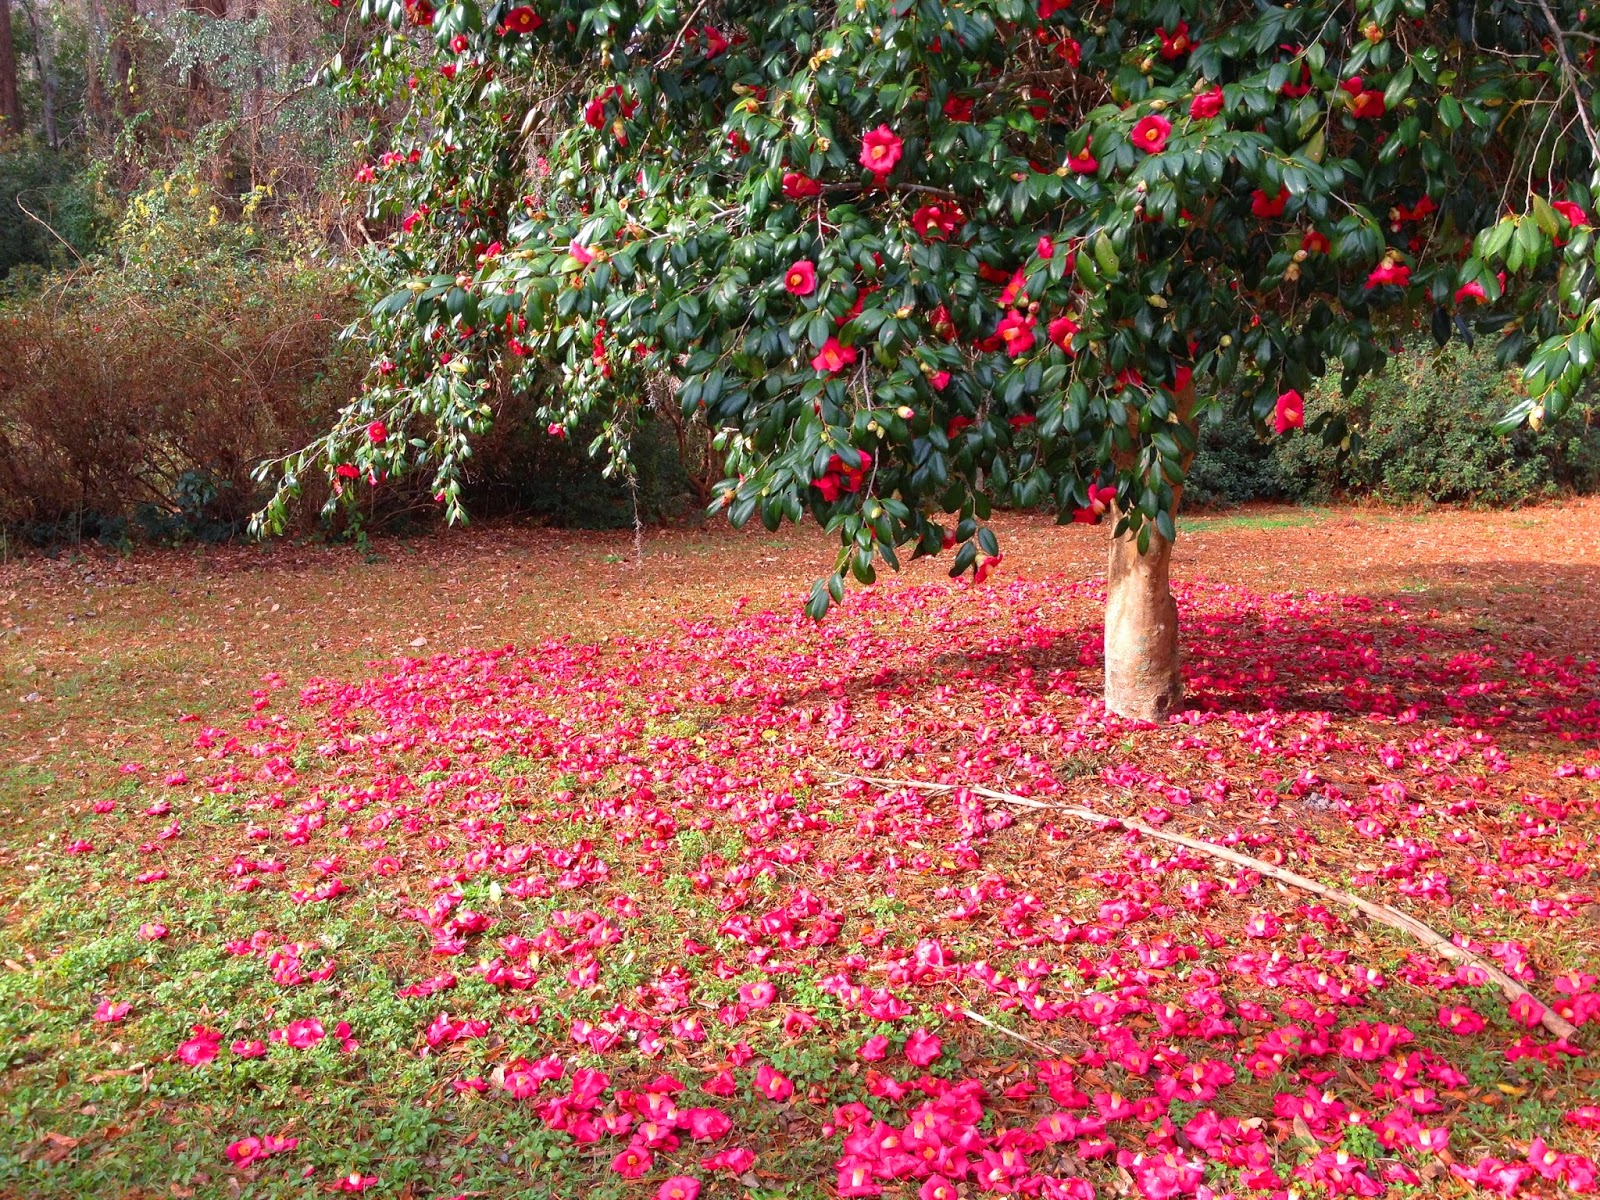
The semi-double flowers are very large with slightly crinkled petals. Each one is bright pink, although the coloration becomes even deeper, almost red in the center.

Like most camellias, Camellia 'Royalty' will require an acidic soil in a sheltered position. While the plant itself is relatively tough the flowers are not and will need to be protected against cold, dry winds and early morning sun otherwise they will brown off. With this in mind plant Camellia 'Royalty' in a north-facing, east-facing or West-facing position. While this particular species will grow better and produce more far flowers in a sunny position, if it doesn't have the protection of light overhead shade from a higher canopy of trees the flowers will suffer in the spring.

There is of course another way to maintain perfect blooms and that is to grow Camellia 'Royalty' in a container and bring it in under cover prior to flowering. That way your blooms will be nothing less than perfect year after year.

Camellia 'Royalty' received the Award of Merit from the Royal Horticultural Society in 1986

For related article click onto the following links:
CAMELLIA JAPONICA 'BLACK LACE'
Camellia japonica 'Black Lace'
CAMELLIA JAPONICA 'Desire'
CAMELLIA JAPONICA 'Mrs. Tingley'
Camellia 'Royalty'

MAGNOLIA X soulangeana

Magnolia x soulangeana
Grown either as a multi-stemmed large shrub or a small tree, Magnolia x soulangeana is considered by many to be one of the very best hardy, flowering specimen plants. Raised by Monsignor Étienne Soulange-Bodin in 1826 it is, in its many cultivars, perhaps the best and most popular magnolia of all.

Magnolia soulangeana flowers
It is deciduous with a wide spreading habit, and dramatically blooms before the leaves emerge in early spring. The white flowers are large, tulip-shaped and stained rose-purple at the base.

Magnolia x soulangeana is the best cultivar for tolerating indifferent clay soils and atmospheric pollution.

It is also notable for its relative tolerance to wind and alkaline soils, vulnerabilities that are common to many other magnolias.

While Magnolia x soulangeana is noted for its ease of cultivation, it is only mildly lime tolerant and certainly not suitable for soils over shallow chalk.

When planting in the garden it will require good drainage, a reasonable depth of rich soil and plenty of moisture. Magnolia x soulangeana will also requires a sheltered position so that the the early flowers have some protection against damage from late frosts. It will also benefit from the protection provided by a higher canopy of trees.

Étienne Soulange-Bodin (1774–1846)
Étienne Soulange-Bodin (1774–1846) was a French agronomist and army officer who created this hybrid magnolia by cross-breeding Magnolia denudata with Magnolia liliiflora.

Though he is barely remembered today, he played a major role in the organization of professional horticulture in France during the early part of the 19th century.

He founded the Institut horticole, the Société d'horticulture de Paris, and became perpetual secretary of the Société royale d'agriculture.

However it wasn't just horticulture where excelled, he was also awarded the cross of the Légion d'honneur and the Iron Cross by Napoleon himself!

There are now over a hundred named horticultural varieties in cultivation, a testament to the quality and popularity of this magnificent plant.

For related articles click onto the following links:
Bomarea caldasii
Camellia japonica 'Black Lace'
Camellia 'Royalty'
HOW TO GROW THE FRANGIPANI TREE- Plumeria rubra var. acutifolia
Japanese Flowering Cherries - Prunus species
Magnolia x soulangeana
THE CANNONBALL TREE - Couroupita guianensis
THE DEVIL'S HAND TREE - Chiranthodendron pentadactylon
Why are my Camellia Leaves Turning Yellow?

GROWING CUCUMBER 'Long White' SEEDS

Cucumber 'Long White' seeds

If you consider yourself to be a competitive gardener, and let's face it many of us are, then you will understand the enormous satisfaction of growing something bigger, better or so unusual that you are the only one amongst your peers to do so.

So if it's vegetables that draw your eye then you would be foolish not to take a look at Cucumber 'Long White' as this is one such crop that is guaranteed to place you two, maybe even three rungs above everyone else!

Cucumber 'Long White'
A first glance Cucumber 'Long White' looks as though it is just a gimmick, but this will all change once you take your first bite! The flesh is firm, sweet and juicy, with a comes with a vibrant taste that can add flavour to your salads without the bitter aftertaste often associated with other home-grown cucumber varieties. Better still, the tender, white skins are so thin that they won't even need peeling.

As you would expect with any long cucumber it will require the additional warmth of a greenhouse and trained against supports. Cucumber 'Long White' will need to planted at a spacing of one plant per 18 inches and will reach an overall height of approximately 9 ft tall.

If you are growing in a northern European climate the you can sow Cucumber 'Long White' seeds from early March to April for greenhouse cropping.

Sow the cucumber seed on its side at a depth of ½ inch in 3 inch pots containing a good quality free-draining, seed compost such as John Innes 'Seed and Cutting'.

Place the pots in a propagator or seal them inside a clear polythene plastic bag at a temperature of 68 degrees Fahrenheit. Place on a warm, bright windowsill, but out of direct sunlight and you can expect germination to occur within 7-10 days. Be aware that emerging seedlings are easily scorched by direct sunlight. The cucumber plants can remain on the windowsill until they are large enough to be transplanted into the greenhouse, and make sure that the compost is kept moist but not wet as this can result in damage to the young roots.

When the cucumber plants have reached a height of 6 inches or so then they are ready to be transplant in the greenhouse. Space them at a rate of 2 plants per grow bag or 18 inches apart if you are growing them in the ground. Keep the greenhouse warm, and humid, but ventilate during the warmest part of the day to reduce the incidence of fungal disease. You can increase humidity by hosing down the greenhouse paths.

You may well need to provide greenhouse shading during the height of the summer. Water well after planting until cucumber plants are fully established.

For related articles click onto the following links:

WHAT IS A RAINBOW ROSE?

What is a rainbow rose - Lucy Roberts


Rainbow roses has been with us for a few years now but as beautiful as they are they seem to defy everything we know about plant breeding. Most of us would have come across spray-dyed orchids, hydrangeas and heathers in our local plant retailers but this is something different. There is no sign of the 'clumsy hand' of spray paint. There are no tell-tail drips, run-off or accidental painting of the leaves. Even close-up the pigmentation within each petal seems to build up and fade naturally without any crossover of colouration.

What is a rainbow rose
So how exactly can a rose cultivar display every colour of the rainbow within a single flower? Is the image just another example of clever photoshop manipulation? It certainly can't be real, therefore it must be a fake. However the truth lies somewhere in between.

While it is not possible to produce a cultivated rose with these incredible colours the main image above has not been tampered with and it is a genuine rose flower.

The truth is that the rainbow rose is a rose which has had its petals artificially coloured. Not only is the method of colouration simple, surprisingly it has been known since before the 11 century AD.

What is a rainbow rose - http://img.xcitefun.net/
The process exploits the rose's vascular bundle and in particular the xylem tubes which are the mechanism by which water is drawn up the stem. The rose stem is split into sections and each section is placed into a jar, containing a different diluted water-soluble pigments.

The colours are drawn up through stem via the vascular bundle and into the petals. The petals becomes stained according to colours within the xylem tube which feed into it. They result is a multi-coloured rose, but due to the process it can only ever available as a cut flower. Just be aware that the additional pigment within the petals will cause the flower to have a much shorter life expectancy when compared to an uncoloured rose.

Lucy Roberts  file is licensed under the Creative Commons Attribution 2.0 Generic license.

For related articles click onto the following links:
ARE RAINBOW ROSES REAL?

WHY IS MY LEMON TREE DROPPING LEAVES?

Why is my lemon tree dropping leaves? - http://breakfastandotherstories.files.wordpress.com/

It can be quite worrying if your once magnificent lemon tree begins to drop its leaves, and it can appear to do so without any obvious cause. However, citrus are not as temperamental as they may seem and will only drop their leaves if they are put under environmental stress.

Why is my lemon tree dropping its leaves
In their native habitat of north-east India, northern Burma, and China, they are blessed with a warm, mild climate. Within this environment they can be considered evergreen but since migrating to cooler climates where it is grown as a commercial crop they have had to cope with harsher weather. In extreme cases leaf drop will occur prior to dormancy, but this is a natural response in which the plant protects itself while waiting for the weather to improve. So rather than being evergreen, lemon trees are in fact deciduous.

Of course for any citrus tree losing its leaves is an exceptional response and only occurs as the last resort of self preservation. It must be considered as a dramatic and even traumatic event in its existence and you can expect to see a certain amount of dieback in branch extremities. Furthermore, recovery will take time and it may take two to three years before it reaches its former glory, but only if it is not subjected to further environmental stress.

Why is my lemon tree dropping its leaves?
The most common reasons behind leaf drop in garden citrus is over-watering. However, in field grown stock under irrigation the most common reason behind leaf drop is damaged or broken irrigation pipes. If kept in terracotta pots with a well-drained compost you can water almost freely over the growing period but as soon as the nights begin to cool you must allow the top few inches of compost to become dry before re-watering. Furthermore, it lemon trees are left outside over winter they may be able to tolerate temperatures below 5°C and even lower for short periods, but any colder and they will drop their leaves. At this point they must be brought in under protection to prevent further damage to the branches. For optimum condition lemon trees prefer a cool winter rest with a minimum winter night temperature of not less than 10°C.

Once under protection they can become a little precious with the low light levels, higher humidity and warmer temperatures. Under these circumstances they can be prone to dropping leaves especially if there are draughts, too high or too low a temperature and either too much or too little water in the winter. Citrus can be placed back outside in the garden once the threat of late frosts is over and have been hardened of a week or so beforehand.

For related articles click onto the following links:
AT WHAT TEMPERATURE DO CITRUS SEEDS GERMINATE AT?

THE CANNONBALL TREE - Couroupita guianensis

The cannonball tree - Couroupita guianensis - Juan Carlos Piola  www.sertox.com.ar


Native to the rainforests of Central and South America, the cannonball tree - Couroupita guianensis, is a large deciduous tree from the Lecythidaceae family known primarily for its impressive and unusual shaped flowers. The species was given the name Couroupita guianensis in 1775 by the French botanist J. F. Aublet and is a member of the Brazil nut family.

Cannonball tree flowers
Although Couroupita guianensis is best known for its cannonball sized fruit, it also produces the most incredible flowers.

The flowers are large, up to 8 inches wide, and often brightly coloured. Each bloom has six petals in shades of pink. They are  red at the base of each petal and yellowish toward the tips. As you would expect there is a ring of stamens at the centre, but unusually there is an arrangement to the stamens which has been modified into a hood.

The highly scented flowers can be produced in huge numbers and are produced in large bunches that can be up to 12 feet long. Some trees flower so profusely that the entire trunk can be buried in flowers! One tree can bear 1000 flowers per day.

The blooms are strongly scented, especially at night and in the early morning. While they do not produce any noticeable nectar, they still attract pollinating insects, such as the large black carpenter bees, to collect the pollen as a source of food. However the peculiar structure of the flower has evolved to attract pollinating bats.

Cannonball tree fruit
The bats will happily eat the pollen, anthers, and stamens of the flower, however the flower produces two types of pollen, fertile pollen from the ring stamens and sterile pollen from the hood structure. As the bats feed on the easily accessible sterile pollen it picks up large amounts of the fertile pollen on its head and rough fur. So much pollen can be collected in this way that when the bat visits a second tree, fertile pollen is easily deposited on the next flower ensuring pollination.

The large woody fruit which gives the species its common name of Cannonball tree is very spherical and can measure up to 10 inches wide. The fruit takes up to a year to mature in most areas, sometimes as long as 18 months, and can contain as many as 500 seeds. When the fruit has fully ripened it will fall from the tree and often crack open when it hits the ground. The seeds are embedded in a six-segmented, fleshy white pulp that turns to a bluish-green colour and emits an unpleasant aroma when exposed to the air. Even so the cannonball shell is extremely tough and will usually remain mostly intact until an animal such as a peccary finds it and breaks it open.

The fruit is edible but the white flesh has such an unpleasant smell that it will put most people off. Be that as it may, there are many medicinal uses that have been found for the plant. Native Amazonian peoples use extracts of several parts of the tree to treat a variety of conditions such as hypertension, tumours, general pain, and inflammation. It has also been used to treat the common cold, stomach ache, skin conditions and wounds, malaria, and even toothache.

For related articles click onto the following links:
Bomarea caldasii
Japanese Flowering Cherries - Prunus species
HOW TO GROW THE FRANGIPANI TREE- Plumeria rubra var. acutifolia
HOW TO GROW FRANGIPANI TREE FROM SEED
HOW TO GROW SWEET CHESTNUT
HOW TO GROW SWEET CHESTNUTS FROM SEED
HOW TO GROW LIQUIDAMBAR STYRACIFLUA
THE FIREWHEEL TREE - Stenocarpus sinuatus
THE CANNONBALL TREE - Couroupita guianensis

WHY HAS MY LAVENDER DIED?

Why has my lavender died?


Lavender plants, particular English lavender - Lavandula angustifolia and its cultivars, are known for being as tough as old boots. They can survive drought, high temperatures and suffer very little pest damage, so how is that that every now and again one gives up the ghost by kicking the bucket?*

Why has my lavender died?
The 'English' common name is a misrepresentation as Lavandula angustifolia is in fact native to the western Mediterranean, primarily the Pyrenees and other mountains in northern Spain.

Its origins give a clue as to why some lavenders fail. They have evolved to survive in regions with low rainfall and excellent drainage, something which they excel at.

So when they are grown in a northern European climate with its clay soils and plenty of rain, lavenders will suffer if certain considerations aren't made.

The biggest cause of lavender death is waterlogged roots, this will either be due to planting in the wrong place or, as in the case of container grown specimens, over watering. Killing with kindness really does happen!

Avoid the common mistake of planting lavender where you want them and instead place them where they will thrive. They need to receive as much sun as possible and if your soil suffers from poor drainage either improve by adding plenty of organic matter and horticultural grit, or grow it in a raised bed or container where good drainage is unavoidable.

Why has my lavender died?
If you lavender is clearly on its last legs but still has a little life left in it then there are steps that can be taken to bring it back from the brink. If the garden specimen it too large to lift then you can dig a trench around the lavender to help its root-ball drain.

Just avoid damaging any roots as you do by digging the trench 6 inches beyond the circumference of the foliage. Container grown specimens can be lifted from the pot and stood on newspapers to help absorb the excess water. Do not water again until you begin to see new growth!

If you lavender does show signs of improvement then learn the lessons and either water considerably less or lift and plant your specimen in a more suitable position.

 *Lavenders are not prone to damage from mixed metaphors.

For related articles click onto the following links:
GROW LAVENDER SEED
HOW TO CONTROL CUCKOO SPIT ON LAVENDER
How to Grow Abutilon 'Kentish Belle'
How to Grow Strawberries in Pots and Containers
HOW TO GROW LAVENDER
HOW TO GROW LAVENDER FROM SEED
HOW TO PROPAGATE LAVENDER FROM CUTTINGS
LAVENDER
Lavender Hedging Plants
The Windflower - Anemone blanda
WHAT IS LAVENDER OIL?
WHEN AND HOW SHOULD YOU PRUNE BACK LAVENDER?
WHEN TO PLANT LAVENDER?
Why has my Lavender Died?

CAMELLIA JAPONICA 'Desire'

Camellia japonica 'Desire'


If truth be told, camellias are not a particular favorite of mine. I agree that their evergreen foliage is particularly lush, and some of them cultivars do produce some extraordinary flowers, but their is one characteristic that ruins my enjoyment of camellias every single time. It is the way their blooms suffer in our cold, wet and windy spring weather.

The cold and the wet are both enemies of the camellia flower turning it to a soggy brown nondescript piece of vegetation very much like an overcooked Brussels sprout. However that is not the end of it as frosts and early morning sunlight will compound the problem.

Camellia Japonica 'Desire'
Therefore it is impossible to create perfection in a camellia unless you are growing it in a protected environment or in a country that has a more suitable climate. This, in my mind, is why there will never be a space for a camellia in my garden - except for one!

Camellia japonica 'Desire' is without doubt an exception to my rule that I can definitely live with. Its pure white blooms are surrounded by a deep pink basal glow and as the buds opens they reveal a striking Fibonacci- like sequence of petals. This pink shading grows even deeper the near it reached the outer edge of petal edges. I have to admit that the contrast of the pale formal flowers against the very dark leaves is particularly appealing to me. Furthermore, Camellia japonica 'Desire' has the benefit of flowering from mid to late season so it is less likely to be damaged by inclement weather.

The 'Desire' cultivar was a result of a hybridization of  Camellia 'Debutante' and 'Dr.Tinsley' that was developed in California in 1973. Like all Camellia japonica hybrids this is a large evergreen shrub with attractive, polished leaves. In fact, you can expect the Camellia japonica 'Desire' to reach about 12 feet in height once mature. As a garden plant it is surprisingly hardy, but in areas prone to late frosts, plant this particular cultivar in a north or west facing site unless there is some light overhead shade from other trees that can offer some protection.

Like the majority of Camellias, 'Desire' will thrive in a good acid or neutral peaty soil, however if this is not available then dog in plenty of ericaceous compost before planting. If you can, water with rain water rather than tap water but if rain water is not available then feed with a water soluble, ericaceous fertilizer every few weeks over the growing period.

For related articles click onto the following link:
Camellia japonica 'Black Lace'
Camellia japonica 'Desire'
Camellia japonica 'Mrs. Tingley'
Camellia 'Royalty'

WHY ARE MY CAMELLIA FLOWERS TURNING BROWN?

Why are my Camellia flowers turning brown?


You have been waiting the best part of a year and your beloved camellia has never looked healthier. It's been mulched, watered with collected rain and so far has avoided the dreaded bud drop. So why is it that after all the love and attention that has been bestowed the flowers on your camellia are still going brown? Is it a fungal disease, or worse still a bacterial infection? Well the good news is that it is neither. The problem is weather related.

Why are my Camellia flowers going brown?
In their native habitat of east and southeast Asia, camellias do not experience late frosts. Unlike us they are blessed with a climate that steadily warms up in the spring with no surprising changes in the weather. The camellia uses day lengths and temperatures to time its flowering initiation, a system which works fine in its native environment, but in northern European climates it has yet to evolve a system which delays its flowering period until a more clement time of year.

The brown marks that appear on the flowers are created by cell death within the petals. This is caused when wet petals are frozen. This damage can be further compounded by the effects of early morning sunshine following a frost.

Aside from purchasing camellia cultivars that will naturally bloom later on in the season you have just the two choices. The first is to move your camellia to a north or west facing site. Of course it will grow stronger and produce more flowers in a sunny site but unless you can provide some overhead shade from a higher canopy of trees it is not advisable.

The second choice is to grow your camellias in containers and bring them in undercover prior to flowering. That way your camellia flowers will be nothing less than perfect year after year.

For related articles click onto the following links:
Camellia japonica 'Black Lace'
CAMELLIA JAPONICA 'Desire'
Camellia 'Royalty'

HOW TO GROW CAMELLIAS

How to grow Camellias - http://danielnathanterry.com/


There are few plants that can compete with the spectacle of a camellia in full flower. Bright, showy flowers set against a background of glossy dark-green leaves, nothing else can come close to it on a sunny spring afternoon. Of course, I am deliberately ignoring all Magnolia species and cultivars for the purpose of this article.

How to grow Camellias
So long as the soil is right then the plant itself is as tough as old boots and will look 'fresh-out-the-box' throughout its life.

However, it's a different story when it comes to camellia flowers as their early flowering can come at the cost of damage from cold, wet and frosty weather.

The genus Camellia is made up of more than 200 species of mainly tender evergreen shrubs and trees native to east and south-east Asia.

They will thrive in a good acidic soil or neutral peaty soil and will benefit from some light overhead shade, particularly in areas prone to late frosts.

Camellias will grow more successfully and flower more freely when positioned in full sun, but if the soil becomes dry in the spring then they can become prone to bud drop. To avoid this pay careful attention to watering during this crucial period and provide a good layer of mulch.

How to grow Camellias
If you growing camellias in England then you will be aware of the damage seen on open flowers from the effects of early morning sunshine following a frost.

If this is familiar to you then a north or west facing site will be best unless light overhead shade from a higher canopy of trees is available.

There is of course another alternative, and that is to grow your camellias in containers and bring them in under cover prior to flowering. That way your camellia flowers will be nothing less than perfect year after year.

Click here for related articles:
Camellia japonica 'Black Lace'
Camellia japonica 'Desire'
Camellia 'Royalty'

HOW TO GET RID OF BLACK MOULD ON A LEMON TREE

How to get rid of black mould on a lemon tree

Finding black mould on your prized lemon trees can be rather an unpleasant shock, but luckily it looks a lot worse than it really is. In fact this particular black mould, commonly known as 'sooty mildew' isn't actually what you would call a disease at all and does not directly damage the tree or any of its leaves.

Black mould and scale insects on a lemon tree 
Rather than than infecting the lemon tree, the fungus is feeding from a sugary substance that has formed on the plant. This is honeydew and it is the undigested sap of the lemon tree that is excreted from the behinds of aphids and scale insects. So instead of a fungal disease you instead have an insect infestation. Of course in extreme cases a thick covering of sooty mould will affect the lemon tree in so far as it blocks light to the leaves. This can cause stunted growth and yellow its foliage.

Luckily the black mould is easily removed by spraying it with a warm, mild, insecticidal soap solution. Allow the solution to soak in for ten minutes or so and then remove the sooty mould from the leaves by gently washing it off with a soft cloth and some more lukewarm water. If insecticidal soap is not available consider using dish soap, or detergent dissolved in water and sprayed onto the plant. One tablespoon of soap per gallon of water is the usual recommendation.

Of course this does not address the underlying cause of aphid or scale infestation and if you intend to eat the lemons fruit then you must treat the pests organically. Pre-packed trigger sprays containing solutions of naturally occurring insecticides such as rotenone and pyrethrin will be available at all good garden outlets. Applied carefully and always read the manufacturer's instructions.

For related articles click onto the following links:
AT WHAT TEMPERATURE DO CITRUS SEEDS GERMINATE AT?

THE EVERGREEN CLEMATIS - Clematis armandii

The evergreen clematis - Clematis armandii

If the clematis genus only brings images of large flowering and blousey cultivars to mind, then you are in for a treat. Clematis armandii is an exception to the usual specimens proffered by most plant retailers, and one worth serious consideration.

Clematis armandii
It immediately sets itself apart from the usual run-of-the-mill clematis with a dense show of glossy, evergreen leaves which are almost tropical in appearance.

Its star-shaped flowers may not be as large or showy as the traditional clematis hybrids, but that isn't a bad thing especially if you are looking for a more romantic or 'designer' effect.

What they lack in size is made up for in numbers as the bright, star-shaped blooms are produced in incredible abundance. It is particularly sought after by gardeners in-the-know as they burst into flower early enough in the year to beat the competition without suffering to much from cold damage. If you are growing Clematis armandii in northern Europe then you can expect the flowers to emerge from April to early May, but in mild winters they can bloom as early as March - as they did this year!

Clematis armandii blooms
Discovered in but the well-known plant hunter Ernest Wilson in 1900, Clematis armandii is native to much of China and northern Burma.

This beautiful species can be at risk from damage during severe winters and so is best grown against in a warm, and sunny sheltered wall out the way of cold winds.

It should be planted in moist, well-drained soil, however it will prefer to have its roots to be in cool, shady spot. Plant the root-ball deeply to help protect against clematis wilt and water well during the first growing season. Mulch around the roots each spring with well-rotted garden compost or farm manure.

The only pruning required is the removal of any dead or useless wood, and the shortening of any shoots that have extended beyond their allotted space.

For related articles click onto the following links:
CLEMATIS CIRRHOSA species and cultivars
CLEMATIS MONTANA - The Anemone Clematis
CLEMATIS montana 'Grandiflora'
Clematis montana
HOW TO GROW CLEMATIS ARMANDII
HOW TO GROW CLEMATIS ‘Bill Mackenzie’
How to Grow Clematis florida 'Sieboldii'
HOW TO GROW CLEMATIS TANGUTICA
How to Grow the Morning Glory from Seed
HOW TO PROPAGATE CLEMATIS BY LAYERING
HOW TO TAKE CUTTINGS FROM CLEMATIS
HOW TO TREAT FOR CLEMATIS WILT?
How to Prune Honeysuckle

WHY HAS MY LAVENDER TURNED WOODY?

Why has my lavender turned woody?


Lavender is one of the most popular of all hardy garden plants, and why wouldn't it be. Stunning silver foliage, highly scented flowers and leaves, and as tough of old boots. What more could you want?

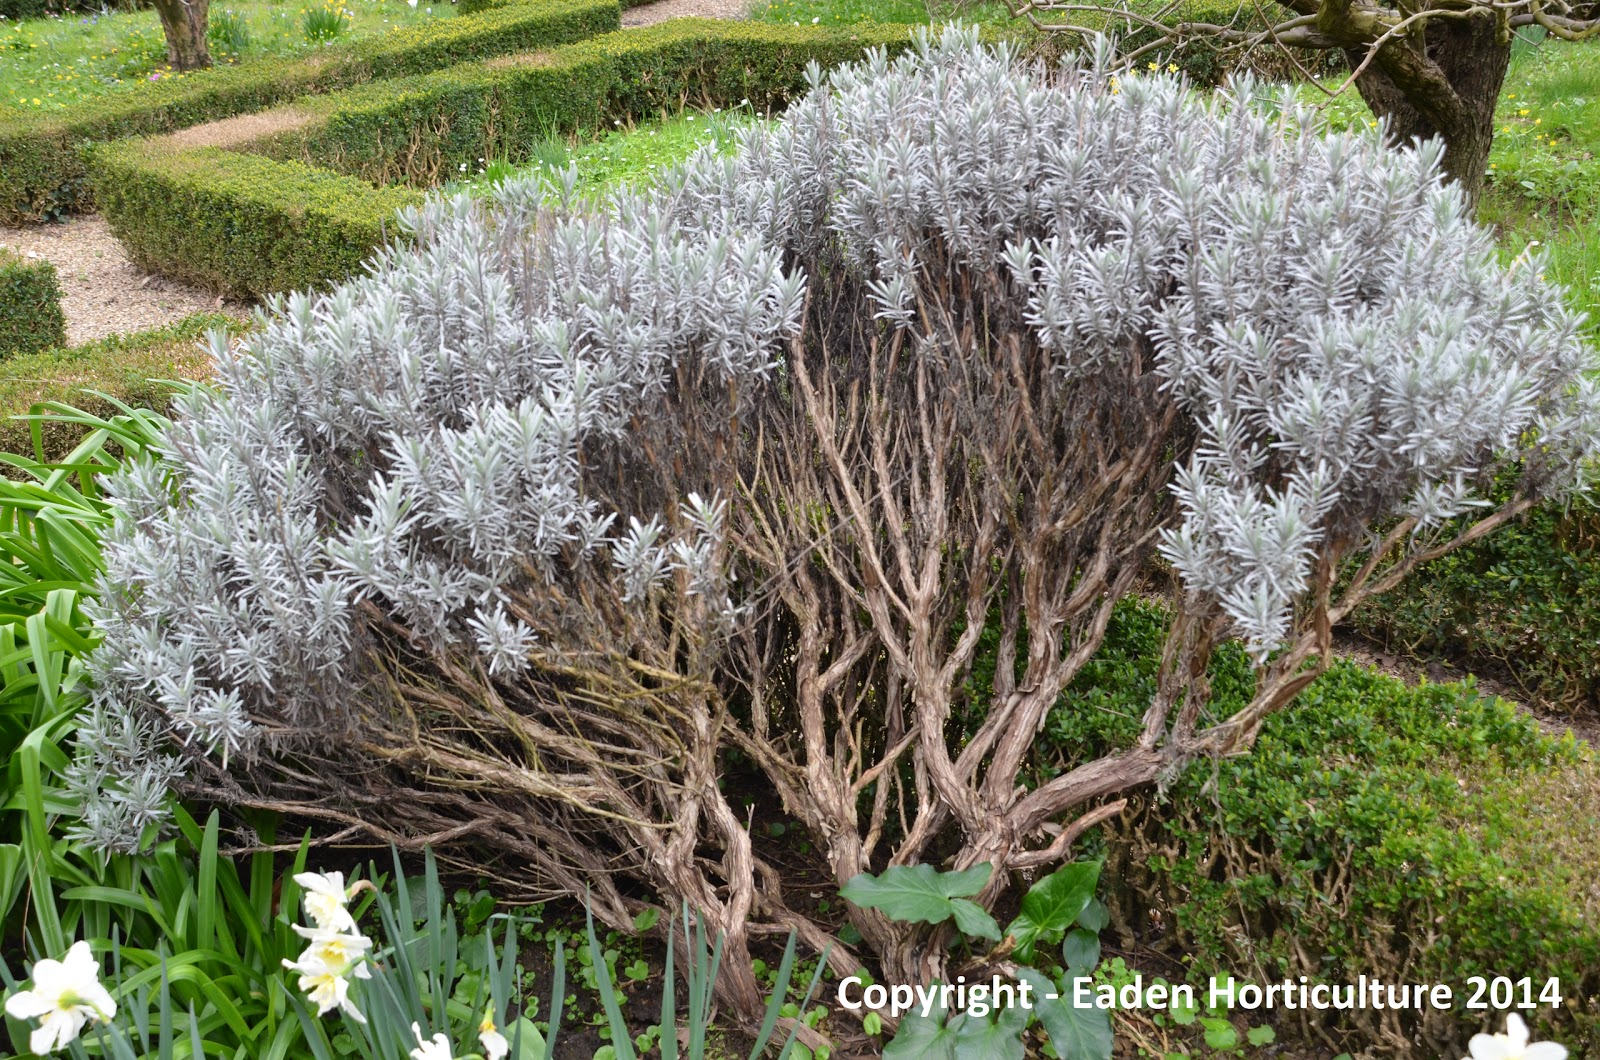
However, as excellent as lavenders may be there is no such thing as a perfect plant and lavenders are no exception. They have one particular annoying habit and that is to produce copious amounts of rather ugly, woody stems. Worse still is that as the plants get older the foliage becomes thin, tough and sinewy creating an even better view of the unattractive stems.

Why has my lavender turned woody?
Luckily there is a solution, and it is to do with the time of year you execute you pruning, but get it wrong and your lavender will end up looking terrible! Get it right and you will be awarded with a specimen full of soft, luxurious growth.

Lavenders should be pruned at the hottest time of the year which in Europe will be August. Lavenders will be naturally dormant at this time, and would have spent the early summer building up reserves of nutrients and carbohydrates in the stems ready to produce plenty of new growth as soon as temperatures drop.

With regards to English lavender - Lavandula angustifolia, you can cut it back by as much as two thirds of its overall height, especially on young plants. In fact you can even cut into the bare wood and still have new dormant shoots emerge lower down. On older specimens, avoid cutting back by any more than a third as you can shock the plant into dormancy after which nothing much will happen until the following year.

For less hardy lavender varieties you should always avoid cutting back hard into the bare wood, so it is important that they are pruned every year without exception. Shape them with shears in late August, aiming to create a rounded mound of foliage.

Lavender stoechas varieties flower in much earlier than traditional varieties, often in May, but are much less hardy than most other garden lavenders. For this species give a very gentle trim after flowering.

For related articles click onto the following links:
GROW LAVENDER SEED
HOW TO CONTROL CUCKOO SPIT ON LAVENDER
HOW TO GROW LAVENDER
HOW TO GROW LAVENDER FROM SEED
How to Grow Trilliums
HOW TO PROPAGATE LAVENDER FROM CUTTINGS
LAVENDER
Lavender Hedging Plants
WHAT IS LAVENDER OIL?
WHEN AND HOW SHOULD YOU PRUNE BACK LAVENDER?
WHEN TO PLANT LAVENDER?
Why has my Lavender Died?
Why has my Lavender turned Woody?

HOW TO GROW TAYBERRIES

How to grow tayberries - http://saanichtoncommunityfarm.blogspot.co.uk/


The tayberry is true gem of the fruit garden, and while not as well known as its berrying cousins it is does in fact produce larger and better flavoured fruits than the loganberry and most raspberries cultivars. Developed in 1979 by the Scottish Horticultural Research Institute, the tayberry is a hybrid of the red raspberry and blackberry and received its name from the river Tay in Scotland.

Tayberry fruits - http://stephcupoftea.blogspot.co.uk/
While they are in many ways better than traditional berry crops their lack of presence of tayberries in the market place is due to their ripe fruits being exceptionally soft at harvest. This prevents them from being harvested mechanically and as such has hindered their success as a commercial crop. Today, Tayberries are mainly grown in gardens and allotments.

Tayberries are also self-pollinating which means that if you are short of space you can get away with the one plant. They will also be productive for up to fifteen or even twenty years.

The tayberry will grow well in the majority of well-drained soils and will benefit from having well-rotted farm manure mixed into the soil before planting. Although they are shade tolerant, they will produce far larger crops when planted in full sun. They do not spread as much as their blackberry parent and so supporting canes are not crucial. However traditional methods of cultivation on a frame of horizontal lines will help prevent diseases by improving the airflow between branches.

Tayberry plants - http://www.crocus.co.uk/
Tayberries are available as potted canes in the autumn, and assuming they are planted by early spring the new tayberry cane will send up fresh new canes which will need to be supported into a frame. Mulch your tayberries every spring with well-rotted farm manures.

You will need to be patient as tayberries fruit on two year old wood so you are unlikely to get fruit this year. However by next July you can look forward to harvesting your first decent crop.

When picking tayberries it is best to treat them like strawberries and keep the stalks in place. This will keep them in better condition for transporting but if you are anything like me them most of them will be eaten well before you get home.

After fruiting, these two year old canes can be cut down to ground level, and the fresh new canes that appear in the spring will take their place.

For related article click onto the following links:
GROW CAPE GOOSEBERRY SEEDS - Physalis peruviana
How to Grow an Apple Tree from Seed
How to Grow Blackberries
How to Grow a Pineapple from Seed
How to Grow Strawberries in Pots and Containers
How to Grow tayberries
HOW TO PRUNE RASPBERRIES