HOW TO GROW THE BLACK-EYED SUSAN VINE - Thunbergia alata

large specimen of Black-Eyed Susan vine - Thunbergia alata with orange flowers
How to grow the Black-Eyed Susan vine - Thunbergia alata


The black-eyed Susan vine - Thunbergia alata is a popular perennial annual self-twining climbing plant noted for its striking blooms. It is an easy to grow plant often grown as pot specimens or as a small climber.

Native to Eastern Africa is has proven to be surprisingly tough, and despite its subtropical to tropical origins it will often overwinter viable seed in the milder regions of northern Europe such as the south of England and Ireland. That being said self-sown seeds are unlike to come into blooms until August.

Orange blooms of Black-Eyed Susan vine - Thunbergia alata
Flowers of the Black-Eyed Susan vine
Under favourable conditions you can expect the black-eyed Susan vine to reach a height of 1.8-2.4 m although in the United Kingdom 1-2 m is more likely. The mid-green leaves are heart or arrow-shaped.

The blooms, which can be up to 5 cm wide, have a flat orange-yellow corolla with a chocolate brown centre. They appear singularly from June to September from the leaf axils.

The Black-Eyed Susan will perform best in an ordinary, well-drained garden soil in a sunny sheltered position. Pot grown specimens can be grown in 15-20 cm pots containing a good quality compost such as John Innes 'No.2'. Provide suitable supports such as strings, wire or canes for he tendrils to climb up.

If you wish to grow them the following year then you can either over-winter the plants under frost-free protection at a temperature of 7-10 degrees Celsius or collect the seeds for sowing in March. Overwintered plants will need to be kept on just the right side of moist. They can be hardened off to outside conditions over 10-14 days once the threat of late frosts have passed.

There are a number of colour variations available including red, orange, white and yellow. Depending on the selection they can also be with or without the characteristic dark centre.

They are surprisingly hardy and while the parent plants won't survive, their seeds have been known to remain viable through the winter in the milder regions of southern England and Ireland. That being said when left to their own devices the soil temperature will not be warm enough for germination until June onwards and therefore flowering will not occur until the end of August.

Main image and in text image credit - Simon Eade gardenofeaden@gmail.com

For related articles click onto the following links:
HOW TO GROW THE BLACK-EYED SUSAN VINE - Thunbergia alata

HOW TO GROW CORYDALIS SOLIDA

Red flowering Corydalis solida cultivar
How to grow Corydalis solida


Native to northern Europe and Asia, Corydalis solida is a popular flowering herbaceous plant noted for its finely cut foliage and the colour variations of its blooms. It is an easy to grow species that does well in the gardens with northern European type climates.

Mauve flowering Corydalis solida cultivar
How to grow Corydalis solida
It was originally named Fumaria bulbosa var. solida in 1753 by Swedish botanist Carl Linnaeus (1707 – 1778), hence its rather unattractive common name of 'fumewort'. Its reclassification to the genus Corydalis was made by notable French botanist Joseph Philippe de Clairville (1742 – 1830) in 1811.

Found growing under the canopy of deciduous woodland, Corydalis solida is considered to be a spring ephemeral. This means that it will grow quickly in the spring coming into bloom before the leaves of the trees emerge to darken the woodland floor. It also means that there is a relatively short window of opportunity to purchase these plants in the spring before the blooms finished the foliage begins to die back.

Under favourable conditions you can expect Corydalis solida to grow to approximately 25 cm high with deeply divided, grey-green foliage.

It produces narrow, long-spurred flowers in March to April on narrow, dense, terminal racemes. The blooms are approximately 2 cm in length and can show colour variations (although not on the same plant), ranging between mauve, purple, red or white.

It will perform best in a well-drained but moist habitat in full sun (if the soil is permanently moist) to full shade under deciduous plants. The soil only needs to need moderately fertile.

The small pebble-like tubers of Corydalis solida are about the size of a marble usually available in the autumn. They should be immediately planted at approximately 5 cm deep and 10cm apart.

Several varieties and cultivars have received the Award of Garden Merit from the Royal Horticultural Society.

Main image credit - Corydalis solida 'George Baker'Peter coxhead https://creativecommons.org/licenses/by-sa/3.0/deed.en

In text image credit - Bernd Haynold Dual License GFDL and CC-by-sa https://creativecommons.org/licenses/by/2.5/deed.en

For related articles click onto the following links:
HOW TO GROW CORYDALIS CASHMERIANA
HOW TO GROW CORYDALIS LUTEA
HOW TO GROW CORYDALIS SOLIDA

HOW TO GROW PHYSOPLEXIS COMOSA FROM SEED

Physoplexis comosa in a pot sunk in sand in an alpine greenhouse
How to grow Physoplexis comosa from seed


Despite being a fascinating and much sought after alpine specimen, Physoplexis comosa is sadly rarely seen outside of botanical gardens and specialist nurseries.  Unlike many examples offered up as alpine plants in your local plant retailers, Physoplexis comosa is the genuine article native to the French and Italian alps. Commonly known as the 'Tufted Horned Rampion' or 'Devil's Claw', like all true alpines it has blooms characteristically larger than its foliage.

It is fairly easy to obtain Physoplexis comosa seeds online throughout the year. If growing under protection they can be sown at any time of year. If being started outside they will need to be sown under the protection of a cold frame in the autumn.

Outdoor germination

Fill a modular tray using a good quality, well-drained seed compost such as John Innes 'Seed and Cutting' Sow Physoplexis comosa seeds onto the surface at a rate of one seed per module. Cover the seed with a thin layer or horticultural grit, or vermiculite. Gently water in using a can with a fine rose on it so as not to disturb the seed then. Keep the soil moist but never waterlogged and avoid the compost drying out completely during germination. You now have two ways to proceed. The first is to place the modular tray in a cold frame, where the natural winter cold should offer ideal conditions for germination to occur in spring.

Indoor germination

The second is to place the tray inside a heated propagator 18-22°C for 2-4 weeks or seal inside a clear polythene bag and place it on a warm bright windowsill (but one which is out of direct sun during the hottest part of the day) for the same time period. As these seeds are grown under protection they will need an enforce period of cold stratification so they will next be moved to a refrigerator for 4-6 weeks at a temperature of approximately -4 to +4°C. After this period return to a temperature between 5-12°C for germination which although will have some variability should expect seedling emergence in up to 6 weeks.

Once the root systems have established in their modules the seedlings will be ready for potting on into 9cm pots, again filled with a well-drained compost. Avoid disturbing the root system and protected under glass before acclimatising the plants to outside conditions when danger of frosts have passed.

Physoplexis comosa will perform best in a gritty, well-drained, poor to moderately fertile alkaline soil in full sun. Be aware that it will need protection from winter wet. Physoplexis comosa can be successfully grown outside under suitable conditions or keep as a container grown specimen in an alpine house.

Image credit - Simon Eade  gardenofeaden@gmail.com

For related articles click onto the following links:
HOW TO GROW CAMPANULA PORTENSCHLAGIANA
HOW TO GROW PHYSOPLEXIS COMOSA
HOW TO GROW PHYSOPLEXIS COMOSA FROM SEED

WHAT IS SHOT HOLE DISEASE?

Apricot trees with shot hole diseases on leaves
What is shot hole disease?


Caused by the fungal pathogen Wilsonomyces carpophilus, shot hole disease is most notable for affecting members of the Prunus genus. Also commonly known as Coryneum blight, it is rarely seen on garden specimens, however it is a serious problem for commercial growers of Almond, apricot, nectarine, peach and cherry trees. Infections can occur anytime between the autumn and spring, but is usually most severe following wet winters. As you would expect, Shot hole disease is most noticeable in spring as the new growth is most susceptible.

Apricot leaves with shot hole disease
What is shot hole disease?
Once a tree has become infected, shot hole disease produces small 1mm to 6mm reddish or purplish-brown spots occasionally surrounded by a light-green to yellow ring. As the disease progresses the spots dry out and then fall away from the leaf leaving characteristic small holes of various sizes. To some the leaves look as though they have been fired upon by shotgun pellets - hence its popular common name.

In significant infections, this loss of material from within the leaves will clearly reduce the amount of photosynthesis that can occur. This then has the knock-on effect of weakening the plant, and decreasing fruit production. To put this into perspective, it is estimated that approximately 80% of the California almond crop may be infested with shot hole disease. This is believed to result in a potential yield loss of 50-75%.

Lifecycle

The shot hole fungus is known to overwinter in infected buds and twig cankers. The spores are dispersed in spring by rainfall. On ornamental prunus species avoid overhead watering as this is a particularly effective way of spore dispersal. Be aware that the spores will remain viable, albeit in a dormant state, for months.

For infection to occur temperatures will need to remain above 2 °C combines with approximately 24 hours of wet conditions. At higher temperatures shot hole infection will take hold in considerable less time. For example only 6 hours at 25 °C.

Control

Remove and dispose of any infected buds, leaves, fruit and twigs, preferably by burning. This includes contaminated leaves around and beneath the tree. In the autumn, apply a spray of copper fungicide or Bordeaux mixture. A subsequent spray during favourable conditions over the winter may also be considered with severe infections. Research in the 1930's found that applications of Bordeaux mixture reduced shot hole disease on peaches from 80% to 9%.

Image credits - Simon Eade gardenofeaden@gmail.com

For related articles click onto the following links:
WHAT IS SHOT HOLE DISEASE?

WHEN AND HOW TO PRUNE BACK BOTTLEBRUSH PLANTS

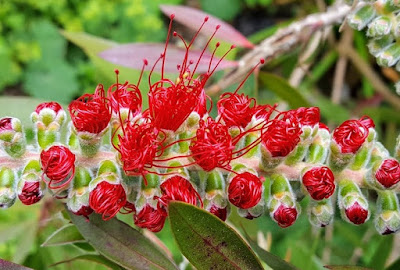
Mature Bottlebrush plant in full flower with red blooms
How to prune back bottlebrush plants


Bottlebrush plants - Callistemon species and varieties, are among the most exotic of all hardy garden specimens. However their unusual growth habit means that most gardeners are reluctant to cut into the wood in case their shape and following season's blooms are affected.

To be fair, bottlebrush plants are usually low maintenance and will require little or no regular pruning. That being said, some forms can easily grow too large for their allocated garden space and will need cutting back one way or the other. Like conifers, avoid cutting back into the inside branches where there are few leaves as you may not see any regrowth.

Bottlebrush flower stem coming into bloom
How to prune back bottlebrush plants
The best time to pruning is from mid to late spring, but if you miss this opportunity you can light prune at the end of the summer. Removing any weak, crossed, rubbing, diseased or dying stems back to the trunk, and remove any suckers from the base as soon as you see them. Rip them from the trunk rather than cut to reduce the incidence of regrowth. This will be the same action for specimens grown with a single trunk but only do this as the suckers emerge. Shoots longer than a few inches will need to be cut. The best results are from rubbing away emerging buds with your thumb.

To guarantee that next season's blooms will remain unaffected and to just generally maintain a shape, lightly prune immediately after flowering - usually just a couple of inches from the growth tips and removing the spent flower structures.

If you are trying to reduce the size of an overgrown specimen, cut back down to size in the spring making sure that this is done well before the new seasons bud form.

In drastic situations, it is not unknown for mature specimens to grow back from being cut down to the ground. However this should only be done as a last resort.

Image credits - Simon Eade gardenofeaden@gmail.com

For related articles click onto the following links:
HOW TO GROW CALLISTEMON 'Captain Cook'
HOW TO GROW CALLISTEMON CITRINUS 'Splendens'
HOW TO GROW CALLISTEMON VIMINALIS
WHEN AND HOW TO PRUNE BACK BOTTLEBRUSH PLANTS
WHEN AND HOW DO YOU PRUNE BACK GARRYA ELLIPTICA

SWISS CHEESE PLANT - Monstera deliciosa

Large specimen of the Swiss Cheese plant - Monstera deliciosa
The Swiss Cheese plant - Monstera deliciosa


Before I start I should mention that the Swiss Cheese plant is neither native to Switzerland and has nothing to do with any dairy product. It is in fact native to the tropical rainforests of southern Mexico and has proven itself to be one of the world's most popular foliage houseplants.

Fruiting spike of the Swiss Cheese plant - Monstera deliciosa
Swiss Cheese plant fruit
The species name 'deliciosa' means delicious referring to the edible fruit which are said to taste similar to a fruit salad, the genus name is derive from the word 'monstrous' and related to the huge size that this plant can grow to - over 10 meters feet in many cases.

Monstera deliciosa was named and described by the Danish botanist Frederik Michael Liebmann (1813 - 1856).

Although often shrubby in habit, the Swiss cheese plants is in fact a climber whose native habitats are usually the understorey of tropical forests. They are technically classed as a hemiepiphyte meaning that it will spends part of its life cycle as an epiphyte (a plant that grows on the surface of another plant and derives its moisture and nutrients from the air, rain or from debris accumulating around it)

To explain, the seedlings of Monstera deliciosa would have germinated in the ground like most other regular plants. Then unlike most other regular plants grows away from the light, which usually helps them to find the nearest tree trunk, up which they begin to climb. As they mature they produce aerial roots and can eventually lose all connection with the ground!

As a climber and under favourable conditions you can expect the Swiss Cheese plant to grow to up to approximately 20 metres high. The large, leathery, glossy, heart-shaped leaves are 25–90 cm long and 25–75 cm wide. The characteristic holes within the leaves are an adaptation to its low light level environment. By producing holes within the leaves each leaf is then capable of attaining a larger size therefore making it more efficient at capturing sun-flecks and occasional shafts of sunlight.

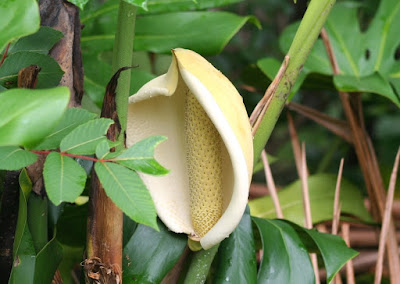
White flower of the Swiss Cheese plant - Monstera deliciosa
Monstera deliciosa bloom
The flowers are self-pollinating and are composed of a special bract known as a spathe which enclosing a spadix.

Monstera deliciosa bloom will perform best high humidity and shade with between 20–30 °C and requires. Growth will stop once temperatures drop below 10 °C. You will only be able to grow the Swiss cheese plant in subtropical climates or warmer as it has no tolerance to frosts. This is why it can only be grown as a houseplant in northern European and Mediterranean climates.

Monstera deliciosa bloom image credit - rjones 0856 https://creativecommons.org/licenses/by/2.0/deed.en
All other images credit - Simon Eade gardenofeaden@gmail.com

For related articles click onto the following links:
HOW TO GROW THE SWISS CHEESE PLANT - Monstera deliciosa
SWISS CHEESE PLANT - Monstera deliciosa

PERFECTLY TIMED DOLPHIN PHOTOGRAPH

Dolphin jumping over a hanging line above a pool
Perfectly timed dolphin photograph
Although nothing to do with gardening, I couldn't help but post this image I took yesterday at Loro Park, Tenerife.

This gorgeous dolphin looks as though it is hanging out to dry on a washing line after a hard day's entertaining. However it is just a badly timed image that tells a story different to reality. What actually happened was this. The dolphin was captured mid-flow during its successful jump over this line.

HOW TO GROW FALLOPIA BALDSCHAUNICA

Specimen Polygonum baldschuanica with white flowers
How to grow Polygonum baldschuanica


Commonly known as the 'Russian vine' or 'mile-a-minute vine', Fallopia baldschuanica (previously and still widely known as Polygonum baldschuanicum) is an extremely vigorous deciduous climber native to most notably China, Russia and Kazakhstan. It is often found for sale in garden centres but truth be told it is not a particularly suitable plant for suburban gardens due to its rapid and difficult to contain growth. So vigorous is it that some may consider it to be little more than an invasive weed.

It is widely grown for its one redeeming feature which is its ability to quickly hide unsightly fences and other garden structures, and some even believe that it can look particularly attractive when trained into trees, old stumps and bare banks. The blooms are not particularly appealing to me, but are known to be a good provider of nectar and pollen for honey bees.

Polygonum baldschuanica white flowers
How to grow Polygonum baldschuanicum
Under favourable conditions the stems of Fallopia baldschuanica can reach an impressive 12 metres long, with pale-green, ovate to heart-shaped leaves.

The small, white tinged pink blooms are borne in conspicuous, crowded panicles appearing throughout the summer and autumn. Once pollinated the blooms can turn increasingly pink, followed by small, shiny black fruits.

Fallopia baldschuanica has proven itself to be particularly robust and will perform well in any type of soil including shallow soils over chalk. Aspect is not really important as it will simply tolerate where it is or grow to more favourable conditions. That being said, young specimens will appreciate a certain amount of shelter and initial support until they become established. Young plants will also need the leading shoots pinched out to encourage side growth. Water in its first year during extended periods of drought.

Prune back during late autumn to maintain its shape and to help contain its growth.

It is rarely affected by pests and diseases although it can be prone to attack from aphids.

Main image credit - Simon Eade gardenofeaden@gmail.com
In text image credit - Jan Samanek https://www.forestryimages.org/browse/detail.cfm?imgnum=5256087 https://creativecommons.org/licenses/by/3.0/us/deed.en